iOS给UIimage添加圆角的两种方式

众所周知,给图片添加圆角有CALayer的cornerRadius,

比如:

最直接的方法:

imgView.layer.cornerRadius1=110;
imgView.clipsToBounds = YES;

这事离屏渲染 (off - screen - rendering), 是很消耗性能的;有很多公司面试的时候会问到,你怎么将图片设置圆角,如果你

只回答了这个方法,那么很遗憾,没有加分。

下面我介绍一种更好的方法:

#import "Bys.h"

@implementation Bys

- (UIImage*)imageWithCornerRadius:(CGFloat)radius{
   CGRect rect = (CGRect){0.f,0.f,self.size};
   // void UIGraphicsBeginImageContextWithOptions(CGSize size, BOOL opaque, CGFloat scale);
   //size——同UIGraphicsBeginImageContext,参数size为新创建的位图上下文的大小
   //    opaque—透明开关,如果图形完全不用透明,设置为YES以优化位图的存储。
   //    scale—–缩放因子
   UIGraphicsBeginImageContextWithOptions(self.size, NO, [UIScreen mainScreen].scale);
   //根据矩形画带圆角的曲线
   CGContextAddPath(UIGraphicsGetCurrentContext(), [UIBezierPath bezierPathWithRoundedRect:rect cornerRadius:radius].CGPath);
   [self drawInRect:rect];
   //图片缩放,是非线程安全的
   UIImage * image = UIGraphicsGetImageFromCurrentImageContext();
   //关闭上下文
   UIGraphicsEndImageContext();
   return image;
}

给UIImage添加生成圆角图片的扩展API: 这是on-screen-rendering

04/27/2017 16:02 下午 posted in  UIKit

iOS app启动的方式(launchOptions)

iOS app启动的方式有哪些:

  1. 自己启动(用户手动点击启动)
  2. urlscheme启动(关于urlScheme的详解点击打开链接)
  3. 本地通知启动 (自己写的本地通知启动,蓝牙模块的启动,地理围栏的启动)
  4. 远程通知启动 (后台服务器的推送通知)

在appdelegate.m文件中

- (BOOL)application:(UIApplication *)application didFinishLaunchingWithOptions:(NSDictionary *)launchOptions

系统给的一些关于launchoption的字典里面的内容

UIKIT_EXTERN NSString *const UIApplicationLaunchOptionsURLKey                   NS_AVAILABLE_IOS(3_0); // userInfo contains NSURL with launch URL
UIKIT_EXTERN NSString *const UIApplicationLaunchOptionsSourceApplicationKey     NS_AVAILABLE_IOS(3_0); // userInfo contains NSString with launch app bundle ID
UIKIT_EXTERN NSString *const UIApplicationLaunchOptionsRemoteNotificationKey    NS_AVAILABLE_IOS(3_0) __TVOS_PROHIBITED; // userInfo contains NSDictionary with payload
UIKIT_EXTERN NSString *const UIApplicationLaunchOptionsLocalNotificationKey     NS_AVAILABLE_IOS(4_0) __TVOS_PROHIBITED; // userInfo contains a UILocalNotification
UIKIT_EXTERN NSString *const UIApplicationLaunchOptionsAnnotationKey            NS_AVAILABLE_IOS(3_2); // userInfo contains object with annotation property list
UIKIT_EXTERN NSString *const UIApplicationProtectedDataWillBecomeUnavailable    NS_AVAILABLE_IOS(4_0);
UIKIT_EXTERN NSString *const UIApplicationProtectedDataDidBecomeAvailable       NS_AVAILABLE_IOS(4_0);
UIKIT_EXTERN NSString *const UIApplicationLaunchOptionsLocationKey              NS_AVAILABLE_IOS(4_0); // app was launched in response to a CoreLocation event.
UIKIT_EXTERN NSString *const UIApplicationLaunchOptionsNewsstandDownloadsKey    NS_AVAILABLE_IOS(5_0) __TVOS_PROHIBITED; // userInfo contains an NSArray of NKAssetDownload identifiers
UIKIT_EXTERN NSString *const UIApplicationLaunchOptionsBluetoothCentralsKey     NS_AVAILABLE_IOS(7_0); // userInfo contains an NSArray of CBCentralManager restore identifiers
UIKIT_EXTERN NSString *const UIApplicationLaunchOptionsBluetoothPeripheralsKey  NS_AVAILABLE_IOS(7_0); // userInfo contains an NSArray of CBPeripheralManager restore identifiers
UIKIT_EXTERN NSString *const UIApplicationLaunchOptionsShortcutItemKey          NS_AVAILABLE_IOS(9_0) __TVOS_PROHIBITED; // userInfo contains the UIApplicationShortcutItem used to launch the app.

// Key in options dict passed to application:[will | did]FinishLaunchingWithOptions and info for UIApplicationDidFinishLaunchingNotification
UIKIT_EXTERN NSString *const UIApplicationLaunchOptionsUserActivityDictionaryKey    NS_AVAILABLE_IOS(8_0); // Sub-Dictionary present in launch options when user activity is present
UIKIT_EXTERN NSString *const UIApplicationLaunchOptionsUserActivityTypeKey          NS_AVAILABLE_IOS(8_0); // Key in user activity dictionary for the activity type

UIKIT_EXTERN NSString *const UIApplicationOpenSettingsURLString NS_AVAILABLE_IOS(8_0);

// Keys for application:openURL:options:
UIKIT_EXTERN NSString *const UIApplicationOpenURLOptionsSourceApplicationKey NS_AVAILABLE_IOS(9_0);   // value is an NSString containing the bundle ID of the originating application
UIKIT_EXTERN NSString *const UIApplicationOpenURLOptionsAnnotationKey NS_AVAILABLE_IOS(9_0);   // value is a property-list typed object corresponding to what the originating application passed in UIDocumentInteractionController's annotation property
UIKIT_EXTERN NSString *const UIApplicationOpenURLOptionsOpenInPlaceKey NS_AVAILABLE_IOS(9_0);   // value is a bool NSNumber, set to YES if the file needs to be copied before use

如何判断如下:

- (BOOL)application:(UIApplication *)application didFinishLaunchingWithOptions:(NSDictionary *)launchOptions {
    // Override point for customization after application launch.
    
    
    //用户自己点击启动
    if(!launchOptions)
    {
        NSLog(@"用户点击app启动");
    }
    else
    {
        NSURL *url = [launchOptions objectForKey:UIApplicationLaunchOptionsURLKey];
        //app 通过urlscheme启动
        if (url) {
            NSLog(@"app 通过urlscheme启动 url = %@",url);
        }
        UILocalNotification *localNotification = [launchOptions objectForKey:UIApplicationLaunchOptionsLocalNotificationKey];
        //通过本地通知启动
        if(localNotification)
        {
            NSLog(@"app 通过本地通知启动 localNotification = %@",localNotification);
        }
        NSDictionary *remoteCotificationDic = [launchOptions objectForKey:UIApplicationLaunchOptionsRemoteNotificationKey];
        //远程通知启动
        if(remoteCotificationDic)
        {
            NSLog(@"app 通过远程推送通知启动 remoteCotificationDic = %@",remoteCotificationDic);
        }
        //位置变动的通知
        if(launchOptions[@"UIApplicationLaunchOptionsLocationKey"])
        {
            //写你的重新定位的代码
        }
    }


    return YES;
}

09/26/2016 16:14 下午 posted in  UIKit

SDWebImage关于图片下载图片重绘的一个缺点

SDWebImage没有提供下载图片后对图片进行调整后再缓存的扩展,唯一的办法是利用

- (UIImage *)imageManager:(SDWebImageManager *)imageManager transformDownloadedImage:(UIImage *)image withURL:(NSURL *)imageURL

这个代理方法去实现,在此处运用代理模式不大合理!因为SDWebImage是单例,这种自定义行为显然不属于全局范畴,明显应该用block传递。再者比如我想用它来加载图片,从网上下载后裁切成圆角再缓存就不行了,因为源码会根据下载下来的图片格式做相应缓存,就算你裁成圆角,并且UIImage本身已经是PNG格式了,但是因为你下载的时候原图是JPG格式的,那么还是会以JPG格式保存,透明部分也没了。

07/08/2016 15:10 下午 posted in  UIKit

iOS事件点击之发生了什么?

转自:http://www.jianshu.com/p/98ed2eaa40ac

tips:这是个很大的话题,我也只能草率的聊聊,希望能给大家填补些小知识

##事件的产生

  1. 我们都知道,当点击屏幕时,会产生一个事件,也就是UIEvent对象
//事件类型
@property(nonatomic,readonly) UIEventType     type 
@property(nonatomic,readonly) UIEventSubtype  subtype 
//事件产生的时间
@property(nonatomic,readonly) NSTimeInterval  timestamp;
  1. 它承载着事件的类型与事件产生的时间
  2. 再来看看事件的类型
typedef NS_ENUM(NSInteger, UIEventType) {
    UIEventTypeTouches,
    UIEventTypeMotion,
    UIEventTypeRemoteControl,
};

typedef NS_ENUM(NSInteger, UIEventSubtype) {
    // available in iPhone OS 3.0
    UIEventSubtypeNone                              = 0,

    // for UIEventTypeMotion, available in iPhone OS 3.0
    UIEventSubtypeMotionShake                       = 1,

    // for UIEventTypeRemoteControl, available in iOS 4.0
    UIEventSubtypeRemoteControlPlay                 = 100,
    UIEventSubtypeRemoteControlPause                = 101,
    UIEventSubtypeRemoteControlStop                 = 102,
    UIEventSubtypeRemoteControlTogglePlayPause      = 103,
    UIEventSubtypeRemoteControlNextTrack            = 104,
    UIEventSubtypeRemoteControlPreviousTrack        = 105,
    UIEventSubtypeRemoteControlBeginSeekingBackward = 106,
    UIEventSubtypeRemoteControlEndSeekingBackward   = 107,
    UIEventSubtypeRemoteControlBeginSeekingForward  = 108,
    UIEventSubtypeRemoteControlEndSeekingForward    = 109,
};

在这里,可以看出,事件被苹果分为3种大类型
触摸事件,加速计事件以及远程遥控事件
子类型事件里都是苹果已经封装好,无需我们自己判断的一些事件
这里我们主要还是讨论触摸事件

##事件的传递

事件已经生成了,那谁来处理它呢?

首先,我们知道事件不是谁都可以处理的
所以,系统需要找到能处理事件的对象
系统把事件加入到一个由UIApplication管理的事件队列中
之所以加入队列而不是栈是因为队列先进先出,意味着先产生的事件,先处理
然后,事件会按照UIApplication -> UIWindow -> SuperView -> SubView的顺序不断的检测
而检测就是靠两个方法hitTest与pointInside
那么检测的顺序是什么呢?

首先,判断窗口能不能处理事件? 如果不能,意味着窗口不是最合适的view,而且也不会去寻找比自己更合适的view,直接返回nil,通知UIApplication,没有最合适的view。
当通过hitTest检测能够响应事件后,还得知道点在不在自己身上,也就是通过pointInside来判断
当点在自己身上后
遍历自己的子控件,寻找有没有比自己更合适的view
如果子控件不接收事件,意味着子控件没有找到最合适的view,然后返回nil,告诉窗口没有找到更合适的view,窗口就知道没有比自己更合适的view,就自己处理事件。
如果子控件接收事件,那么将继续上面的过程,一直找到满足所有条件的控件
最终把事件交由该控件处理
整个传递过程就此完结

比较详细的解说这个博客里面有例子和解析

##事件与runloop

我们都知道runloop在没有事件的时候会处于休眠状态
而休眠时,调用的就是下面这个函数:
__CFRunLoopServiceMachPort(waitSet, &msg, sizeof(msg_buffer), &livePort) {
mach_msg(msg, MACH_RCV_MSG, port); // thread wait for receive msg
}
这个函数等待接收mach_port消息
iOS中有很多进程通信的方式Mach Ports,Distributed Notifications,Distributed Objects,XPC等等
这个 mach_port就是其中一种
Core Foundation和Foundation为Mach端口提供了高级API。在内核基础上封装的CFMachPort / NSMachPort可以用做runloop源
而这个源,正是我们经常在调用栈里看到的source0与source1
苹果注册了一个 Source1 (基于 mach port 的) 用来接收系统事件,其回调函数为 __IOHIDEventSystemClientQueueCallback()
当我们触发了事件(触摸/锁屏/摇晃等)后
由IOKit.framework生成一个 IOHIDEvent事件
而IOKit是苹果的硬件驱动框架
由它进行底层接口的抽象封装与系统进行交互传递硬件感应的事件
它专门处理用户交互设备,由IOHIDServicesIOHIDDisplays两部分组成
其中IOHIDServices是专门处理用户交互的,它会将事件封装成IOHIDEvents对象,详细请看这里
然后这些事件又由SpringBoard接收,它只接收收按键(锁屏/静音等),触摸,加速,接近传感器等几种 Event
接着用mach port转发给需要的App进程
随后苹果注册的那个 Source1 就会触发回调,并调用 _UIApplicationHandleEventQueue()进行应用内部的分发
_UIApplicationHandleEventQueue()把IOHIDEvent处理包装成UIEvent进行处理分发,我们平时的UIGesture/处理屏幕旋转/发送给 UIWindow/UIButton 点击、touchesBegin/Move/End/Cancel这些事件,都是在这个回调中完成

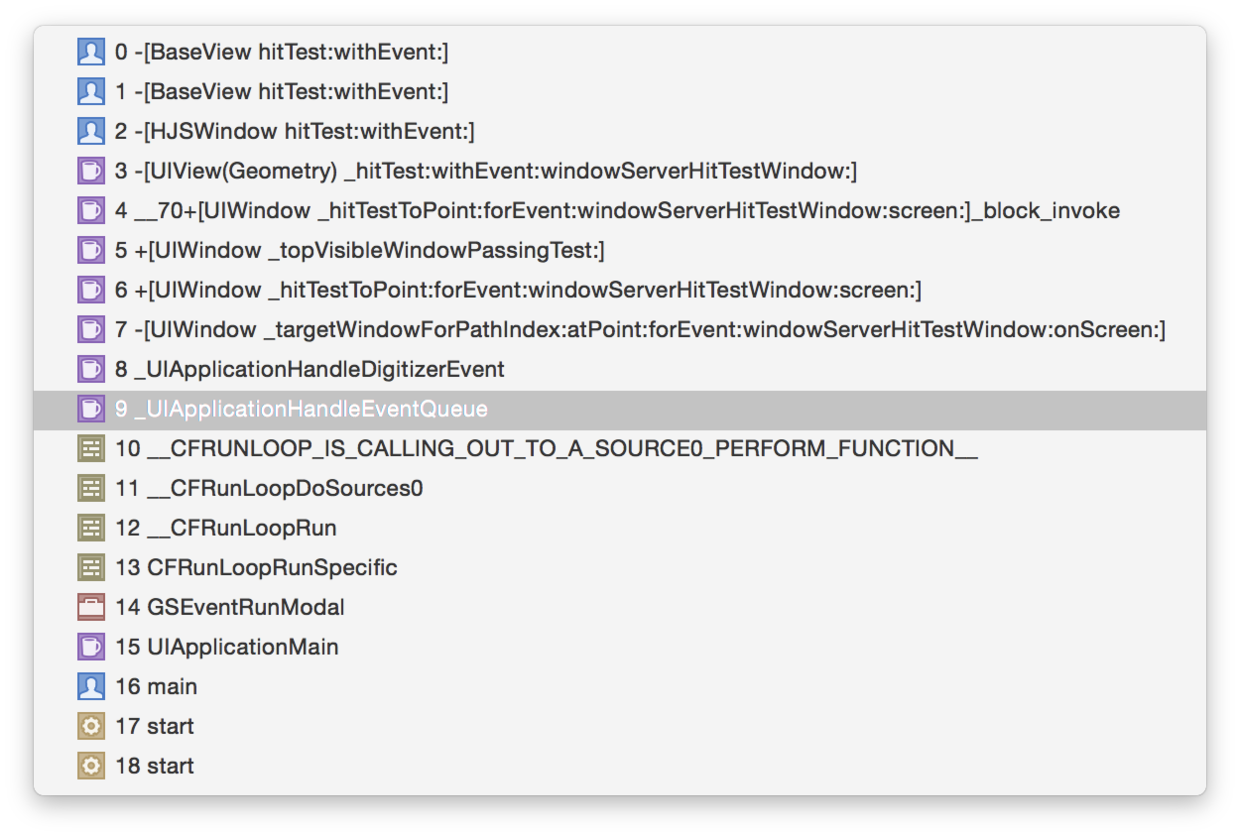
在这个方法、函数调用栈中,其他都入前面我们所说
但是细心的人会注意到里面runloop调用的是source0,而不是source1
这个之前我也很费解,后来查资料才知道
首先是由那个Source1 接收IOHIDEvent,之后再回调__IOHIDEventSystemClientQueueCallback()内触发的Source0,Source0再触发的 _UIApplicationHandleEventQueue()。所以UIButton事件看到是在 Source0 内的
从别处弄来的部分runloop代码,可以解释mach_msg引起的休眠以及观察者引发的回调,整个runloop的运作过程在里面也有详细的解释

/// 用DefaultMode启动
void CFRunLoopRun(void) {
    CFRunLoopRunSpecific(CFRunLoopGetCurrent(), kCFRunLoopDefaultMode, 1.0e10, false);
}

/// 用指定的Mode启动,允许设置RunLoop超时时间
int CFRunLoopRunInMode(CFStringRef modeName, CFTimeInterval seconds, Boolean stopAfterHandle) {
    return CFRunLoopRunSpecific(CFRunLoopGetCurrent(), modeName, seconds, returnAfterSourceHandled);
}

/// RunLoop的实现
int CFRunLoopRunSpecific(runloop, modeName, seconds, stopAfterHandle) {

    /// 首先根据modeName找到对应mode
    CFRunLoopModeRef currentMode = __CFRunLoopFindMode(runloop, modeName, false);
    /// 如果mode里没有source/timer/observer, 直接返回。
    if (__CFRunLoopModeIsEmpty(currentMode)) return;

    /// 1. 通知 Observers: RunLoop 即将进入 loop。
    __CFRunLoopDoObservers(runloop, currentMode, kCFRunLoopEntry);

    /// 内部函数,进入loop
    __CFRunLoopRun(runloop, currentMode, seconds, returnAfterSourceHandled) {

        Boolean sourceHandledThisLoop = NO;
        int retVal = 0;
        do {

            /// 2. 通知 Observers: RunLoop 即将触发 Timer 回调。
            __CFRunLoopDoObservers(runloop, currentMode, kCFRunLoopBeforeTimers);
            /// 3. 通知 Observers: RunLoop 即将触发 Source0 (非port) 回调。
            __CFRunLoopDoObservers(runloop, currentMode, kCFRunLoopBeforeSources);
            /// 执行被加入的block
            __CFRunLoopDoBlocks(runloop, currentMode);

            /// 4. RunLoop 触发 Source0 (非port) 回调。
            sourceHandledThisLoop = __CFRunLoopDoSources0(runloop, currentMode, stopAfterHandle);
            /// 执行被加入的block
            __CFRunLoopDoBlocks(runloop, currentMode);

            /// 5. 如果有 Source1 (基于port) 处于 ready 状态,直接处理这个 Source1 然后跳转去处理消息。
            if (__Source0DidDispatchPortLastTime) {
                Boolean hasMsg = __CFRunLoopServiceMachPort(dispatchPort, &msg)
                if (hasMsg) goto handle_msg;
            }

            /// 通知 Observers: RunLoop 的线程即将进入休眠(sleep)。
            if (!sourceHandledThisLoop) {
                __CFRunLoopDoObservers(runloop, currentMode, kCFRunLoopBeforeWaiting);
            }

            /// 7. 调用 mach_msg 等待接受 mach_port 的消息。线程将进入休眠, 直到被下面某一个事件唤醒。
            /// • 一个基于 port 的Source 的事件。
            /// • 一个 Timer 到时间了
            /// • RunLoop 自身的超时时间到了
            /// • 被其他什么调用者手动唤醒
            __CFRunLoopServiceMachPort(waitSet, &msg, sizeof(msg_buffer), &livePort) {
                mach_msg(msg, MACH_RCV_MSG, port); // thread wait for receive msg
            }

            /// 8. 通知 Observers: RunLoop 的线程刚刚被唤醒了。
            __CFRunLoopDoObservers(runloop, currentMode, kCFRunLoopAfterWaiting);

            /// 收到消息,处理消息。
            handle_msg:

            /// 9.1 如果一个 Timer 到时间了,触发这个Timer的回调。
            if (msg_is_timer) {
                __CFRunLoopDoTimers(runloop, currentMode, mach_absolute_time())
            } 

            /// 9.2 如果有dispatch到main_queue的block,执行block。
            else if (msg_is_dispatch) {
                __CFRUNLOOP_IS_SERVICING_THE_MAIN_DISPATCH_QUEUE__(msg);
            } 

            /// 9.3 如果一个 Source1 (基于port) 发出事件了,处理这个事件
            else {
                CFRunLoopSourceRef source1 = __CFRunLoopModeFindSourceForMachPort(runloop, currentMode, livePort);
                sourceHandledThisLoop = __CFRunLoopDoSource1(runloop, currentMode, source1, msg);
                if (sourceHandledThisLoop) {
                    mach_msg(reply, MACH_SEND_MSG, reply);
                }
            }

            /// 执行加入到Loop的block
            __CFRunLoopDoBlocks(runloop, currentMode);


            if (sourceHandledThisLoop && stopAfterHandle) {
                /// 进入loop时参数说处理完事件就返回。
                retVal = kCFRunLoopRunHandledSource;
            } else if (timeout) {
                /// 超出传入参数标记的超时时间了
                retVal = kCFRunLoopRunTimedOut;
            } else if (__CFRunLoopIsStopped(runloop)) {
                /// 被外部调用者强制停止了
                retVal = kCFRunLoopRunStopped;
            } else if (__CFRunLoopModeIsEmpty(runloop, currentMode)) {
                /// source/timer/observer一个都没有了
                retVal = kCFRunLoopRunFinished;
            }

            /// 如果没超时,mode里没空,loop也没被停止,那继续loop。
        } while (retVal == 0);
    }

    /// 10. 通知 Observers: RunLoop 即将退出。
    __CFRunLoopDoObservers(rl, currentMode, kCFRunLoopExit);
}

##小结

上面这些其实要挖可以挖得很深,但是在实际开发中并不会用到,只要了解在我们触发事件时,从我们平时用的API,到系统的runloop,再到一些底层发生了什么,科普一下就好

06/21/2016 13:54 下午 posted in  UIKit

CALayer图层增加渐变色-CAGradientLayer

iOS中Layer的坐标系统:

效果:

代码实例如下:

- (void)viewDidLoad
{
    [super viewDidLoad];

    CAGradientLayer *colorLayer = [CAGradientLayer layer];
    colorLayer.frame    = (CGRect){CGPointZero, CGSizeMake(200, 200)};
    colorLayer.position = self.view.center;
    [self.view.layer addSublayer:colorLayer];

    // 颜色分配
    colorLayer.colors = @[(__bridge id)[UIColor redColor].CGColor,
      (__bridge id)[UIColor greenColor].CGColor,
      (__bridge id)[UIColor blueColor].CGColor];
    
    // 颜色分割线
    colorLayer.locations  = @[@(0.25), @(0.5), @(0.75)];
    
    // 起始点
    colorLayer.startPoint = CGPointMake(0, 0);
    
    // 结束点
    colorLayer.endPoint   = CGPointMake(1, 0);
}

颜色分配严格遵守Layer的坐标系统,locations,startPoint,endPoint都是以Layer坐标系统进行计算的.
而locations并不是表示颜色值所在位置,它表示的是颜色在Layer坐标系相对位置处要开始进行渐变颜色了.

CAGradientLayer 的这四个属性 colors locations startPoint endPoint 都是可以进行动画的哦.
附录:
稍微复杂点的动画效果

代码实例:

//
//  RootViewController.m
//
//  Copyright (c) 2014年 Y.X. All rights reserved.
//

#import "RootViewController.h"
#import "YXGCD.h"

@interface RootViewController ()

@property (nonatomic, strong) GCDTimer  *timer;

@end

@implementation RootViewController

- (void)viewDidLoad
{
  [super viewDidLoad];

  CAGradientLayer *colorLayer = [CAGradientLayer layer];
  colorLayer.backgroundColor = [UIColor blueColor].CGColor;
  colorLayer.frame	= (CGRect){CGPointZero, CGSizeMake(200, 200)};
  colorLayer.position = self.view.center;
  [self.view.layer addSublayer:colorLayer];

  // 颜色分配
  colorLayer.colors = @[(__bridge id)[UIColor cyanColor].CGColor,
              (__bridge id)[UIColor orangeColor].CGColor,
              (__bridge id)[UIColor magentaColor].CGColor];
  
  // 起始点
  colorLayer.startPoint = CGPointMake(0, 0);
  
  // 结束点
  colorLayer.endPoint   = CGPointMake(1, 0);
  
  _timer = [[GCDTimer alloc] initInQueue:[GCDQueue mainQueue]];
  [_timer event:^{
    
    static CGFloat test = - 0.1f;
    
    if (test >= 1.1)
    {
      test = - 0.1f;
      [CATransaction setDisableActions:YES];
      colorLayer.locations  = @[@(test), @(test + 0.05), @(test + 0.1)];
    }
    else
    {
      [CATransaction setDisableActions:NO];
      colorLayer.locations  = @[@(test), @(test + 0.05), @(test + 0.1)];
    }
    
    test += 0.1f;
    
  } timeInterval:NSEC_PER_SEC];
  [_timer start];
}

@end

代码实例:

_timer = [[GCDTimer alloc] initInQueue:[GCDQueue mainQueue]];
  [_timer event:^{
    
    static CGFloat test = - 0.1f;
    
    if (test >= 1.1)
    {
      test = - 0.1f;
      [CATransaction setDisableActions:NO];
      colorLayer.locations  = @[@(test), @(test + 0.01), @(test + 0.011)];
    }
    else
    {
      [CATransaction setDisableActions:NO];
      colorLayer.locations  = @[@(test), @(test + 0.01), @(test + 0.011)];
    }
    
    test += 0.1f;
    
  } timeInterval:NSEC_PER_SEC];
  [_timer start];
06/20/2016 13:46 下午 posted in  UIKit