[阿里云ECS]GitLab的安装及使用
##前言
GitLab是利用 Ruby on Rails 一个开源的版本管理系统,实现一个自托管的Git项目仓库,可通过Web界面进行访问公开的或者私人项目。
它拥有与Github类似的功能,能够浏览源代码,管理缺陷和注释。可以管理团队对仓库的访问,它非常易于浏览提交过的版本并提供一个文件历史库。
团队成员可以利用内置的简单聊天程序(Wall)进行交流。
它还提供一个代码片段收集功能可以轻松实现代码复用,便于日后有需要的时候进行查找。
###Git的家族成员
Git:是一种版本控制系统,是一个命令,是一种工具。
Gitlib:是用于实现Git功能的开发库。
Github:是一个基于Git实现的在线代码托管仓库,包含一个网站界面,向互联网开放。
GitLab:是一个基于Git实现的在线代码仓库托管软件,你可以用gitlab自己搭建一个类似于Github一样的系统,一般用于在企业、学校等内部网络搭建git私服。
###Gitlab的服务构成
Nginx:静态web服务器。
gitlab-shell:用于处理Git命令和修改authorized keys列表。
gitlab-workhorse:轻量级的反向代理服务器。
logrotate:日志文件管理工具。
postgresql:数据库。
redis:缓存数据库。
sidekiq:用于在后台执行队列任务(异步执行)。
unicorn:An HTTP server for Rack applications,GitLab Rails应用是托管在这个服务器上面的。
###GitLab工作流程
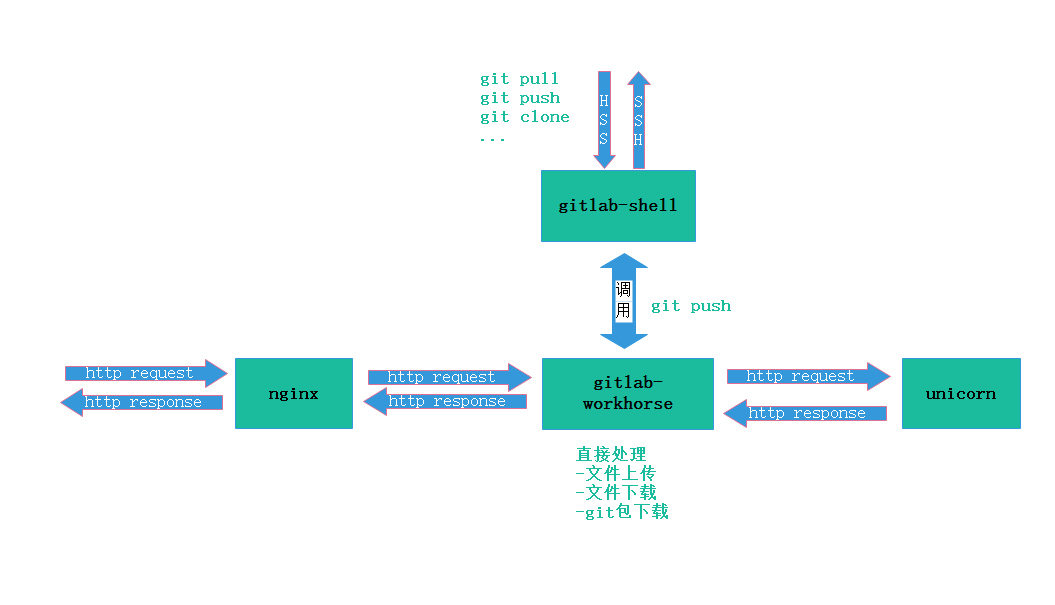
###GitLab Shell
GitLab Shell有两个作用:为GitLab处理Git命令、修改authorized keys列表。
当通过SSH访问GitLab Server时,GitLab Shell会:
限制执行预定义好的Git命令(git push, git pull, git annex)
调用GitLab Rails API 检查权限
执行pre-receive钩子(在GitLab企业版中叫做Git钩子)
执行你请求的动作 处理GitLab的post-receive动作
处理自定义的post-receive动作
当通过http(s)访问GitLab Server时,工作流程取决于你是从Git仓库拉取(pull)代码还是向git仓库推送(push)代码。
如果你是从Git仓库拉取(pull)代码,GitLab Rails应用会全权负责处理用户鉴权和执行Git命令的工作;
如果你是向Git仓库推送(push)代码,GitLab Rails应用既不会进行用户鉴权也不会执行Git命令,它会把以下工作交由GitLab Shell进行处理:
- 调用GitLab Rails API 检查权限
- 执行pre-receive钩子(在GitLab企业版中叫做Git钩子)
- 执行你请求的动作
- 处理GitLab的post-receive动作
- 处理自定义的post-receive动作
###GitLab Workhorse
GitLab Workhorse是一个敏捷的反向代理。它会处理一些大的HTTP请求,比如文件上传、文件下载、Git push/pull和Git包下载。其它请求会反向代理到GitLab Rails应用,即反向代理给后端的unicorn
##Gitlab环境部署
ECS配置要求:内存2G以上
方法一:镜像部署
镜像名称:GitLab代码管理(Centos 64位 | GitLab) | 镜像帮助文档
进入镜像详情页面,单击立即购买,按提示步骤购买 ECS 实例。
购买完成之后,登录”ECS 管理控制台”,在左边导航栏里,单击”实例”,进入 ECS 实例列表页,选择所购 ECS 实例所在的地域,并找到所购 ECS 实例,在”IP 地址”列获取该实例的公网 IP 地址。
注意:镜像部署好后默认是禁止远端访问的,所以直接访问ECS服务器的公网IP是不能访问到GitLab的登录界面的,请先运行/alidata目录下的gitlab_opennet.sh脚本,开启远程访问,然后再通过浏览器访问公网IP来访问GitLab的主页。
方法二:手动部署:
1、配置yum源
vim /etc/yum.repos.d/gitlab-ce.repo
复制以下内容:
[gitlab-ce]
name=gitlab-ce
baseurl=http://mirrors.tuna.tsinghua.edu.cn/gitlab-ce/yum/el7
Repo_gpgcheck=0
Enabled=1
Gpgkey=https://packages.gitlab.com/gitlab/gitlab-ce/gpgkey
       https://packages.gitlab.com/gitlab/gitlab-ce/gpgkey/gitlab-gitlab-ce-3D645A26AB9FBD22.pub.gpg
sslverify=1
sslcacert=/etc/pki/tls/certs/ca-bundle.crt
metadata_expire=300
2、更新本地yum缓存
sudo yum makecache
3、安装GitLab社区版
sudo yum install gitlab-ce        #自动安装最新版
//sudo yum install gitlab-ce-x.x.x    #安装指定版本
GitLab常用命令:
sudo gitlab-ctl start    # 启动所有 gitlab 组件;
sudo gitlab-ctl stop        # 停止所有 gitlab 组件;
sudo gitlab-ctl restart        # 重启所有 gitlab 组件;
sudo gitlab-ctl status        # 查看服务状态;
sudo gitlab-ctl reconfigure        # 启动服务;
sudo vim /etc/gitlab/gitlab.rb        # 修改默认的配置文件;
gitlab-rake gitlab:check SANITIZE=true --trace    # 检查gitlab;
sudo gitlab-ctl tail        # 查看日志;
4、修改配置文件
#修改url,供外部访问
[root@gitlab ~]# vi /etc/gitlab/gitlab.rb
external_url'http://gitlab.server.com'
external_url 修改成自己的ip或者域名
#修改配置文件之后,需要重新是配置文件生效下,初始化下
[root@gitlab ~]#gitlab-ctl reconfigure #这里会花费一定的时间(1-10min),如果这里内存小,将会花费大量时间
Recipe: gitlab::gitlab-rails
  *execute[clear the gitlab-rails cache] action run
    -execute /opt/gitlab/bin/gitlab-rake cache:clear
  *execute[clear the gitlab-rails cache] action run
    -execute /opt/gitlab/bin/gitlab-rake cache:clear
Recipe: gitlab::unicorn
  *service[unicorn] action restart
    -restart service service[unicorn]
Recipe: gitlab::redis
  *ruby_block[reload redis svlogd configuration] action create
    -execute the ruby block reload redis svlogd configuration
Recipe: gitlab::postgresql
  *ruby_block[reload postgresql svlogd configuration] action create
    -execute the ruby block reload postgresql svlogd configuration
Recipe: gitlab::unicorn
  *ruby_block[reload unicorn svlogd configuration] action create
    -execute the ruby block reload unicorn svlogd configuration
Recipe: gitlab::sidekiq
  *ruby_block[reload sidekiq svlogd configuration] action create
    -execute the ruby block reload sidekiq svlogd configuration
Recipe: gitlab::gitlab-workhorse
  *service[gitlab-workhorse] action restart
    -restart service service[gitlab-workhorse]
  *ruby_block[reload gitlab-workhorse svlogd configuration] action create
    -execute the ruby block reload gitlab-workhorse svlogd configuration
Recipe: gitlab::gitlab-workhorse
  *service[gitlab-workhorse] action restart
    -restart service service[gitlab-workhorse]
  *ruby_block[reload gitlab-workhorse svlogd configuration] action create
    -execute the ruby block reload gitlab-workhorse svlogd configuration
Recipe: gitlab::nginx
  *ruby_block[reload nginx svlogd configuration] action create
    -execute the ruby block reload nginx svlogd configuration
Recipe: gitlab::logrotate
  *ruby_block[reload logrotate svlogd configuration] action create
    -execute the ruby block reload logrotate svlogd configuration

Running handlers:
Running handlers complete
Chef Client finished, 222/309 resources updatedin 02 minutes 50 seconds
`该过程还要进行域名解析或者IP指定`
5、启动Gitlab服务
[root@gitlab ~]# gitlab-ctl start
ok: down:gitaly: 0s, normally up
ok: down:gitlab-monitor: 1s, normally up
ok: down: gitlab-workhorse: 0s, normally up
ok: down: logrotate: 0s, normally up
ok: down: nginx: 0s, normally up
ok: down:node-exporter: 0s, normally up
ok: down:postgres-exporter: 1s, normally up
ok: down: postgresql: 0s, normally up
ok: down:prometheus: 1s, normally up
ok: down: redis: 0s, normally up
ok: down:redis-exporter: 0s, normally up
ok: down: sidekiq: 0s, normally up
ok: down: unicorn: 1s, normally up
注解:
绿色部分是9中新添加的
ü gitlab-workhorse这个“工作马”,就是gitlab-Git-http-server(GitlabV8.0出现,V8.2名称变更为Gitlab-workhorse)
ü sidekiq多线程启动
ü unicorn是ruby的http server,可以通过http://localhost:8080端口访问, 默认端口是8080
ü nginx作为方向代理,代理到unicorn,nginx默认端口是80
ü postgresql作为数据库,默认端口是5432
ü redis作为一个队列(NoSql),用于存储用户session和任务,任务包括新建仓库、发送邮件等等,默认端口是6379
ü logrotate切割日志
ü prometheus监控,默认端口9090
ü gitlab-monitor默认端口9168
注:
(可选)如果系统资源不足,可以通过以下命令关闭Sidekiq来释放一部分内存
[root@gitlab ~]# gitlab-ctl stop sidekiq
ok: down: sidekiq: 0s, normally up
参考:
https://packages.gitlab.com/gitlab/gitlab-ce/install#manual
Copyright © 2015 Powered by MWeb, 豫ICP备09002885号-5